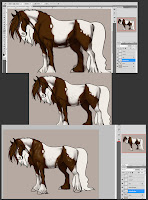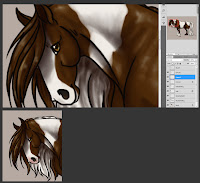
Now comes the shading part. I add another layer for shading. Please note that 2 separate layers were created. One for shading on the body. And one for shading the hair. Using the 2nd Brush, I lower the opacity to around 40-50% and the flow to around 20%. I pick a darker color and start blocking in the places where there will be shadows. I also change the eraser brush to Airbrush Hard Round and play around with the Opacity. If I don't like the shading at a particular place and feel it is too dark, I use the eraser to make it light. Since I am using the Airbrush Hard Round, pressure applied to the tablet plays a BIG role in how much color and with what intensity it is applied. Once I am satisfied with painting the shadows, I make another layer and start painting the highlights. The darker the color, the more shiny and reflective it will be. I use a light creamish color for the highlight part. Also, here, I use the smudge tool a little to blend the highlight. Once I am satisfied with the body, I move on to the hair. I use the same principle except I click on the shape dynamics this time. What that does is, taper the paint according to the pressure I apply on the tablet. It is handy when painting hair because hair become thinner at the end.

I add color to the other areas like the nose, eyes and the hooves of the horse. I also change the brush to Airbrush Soft Round 50% Flow pick a pinkish color, lower the opacity and paint the region around the muzzle. Horses usually have either pinkish or blackish area around the muzzle. Google horses for more information.

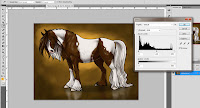
Once I am satisfied with the horse, I move onto the background. For this image, I have used a very simple background. I add a layer, move to second last in the Layer list and fill in a golden color. I change my brush back to the 2nd brush, pick a darker color and start painting the background. Keep in mind that darker colors are usually added to places that are further away from the area of interest. I pick a lighter color and add it around the horse like a rim. Like I said, darker color away from the area of interest and lighter color to highlight the area of interest. I play around with the brush settings, click on scatter, and paint some more. This gives interesting textures. I would advise you to check out the brush settings. Try painting on an empty canvas to get an idea of what tool does what.
I add another layer over the background layer and with the eye-dropper tool, I pick colors from the horse and paint its reflection. Once done, I go to Filter>Blur>Gaussian Blur to soften the brush strokes. I reduce the layer's opacity. I also add a shadow of the horse on a separate layer. I change the layer setting from Normal to Multiply and lower it's opacity too. Multiply layer setting is good when u are wanting to add more depth to the shadow. once all this is done I save the file into a .jpg and open that file. I hit Ctrl+L to open the Levels menu and play around with the settings of the brightness and contrast of the image. Once satisfied, I click on OK and hit save.

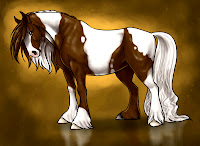
This is how the final image looks like.
Before ending, I would like to add that whenever you start painting something, please do a thorough research for lighting, perspective, anatomy, types of skins, etc. Practice as much as you can and EXPERIMENT. Photoshop is a vast ocean and you will discover a lot of new things everyday. Try making custom brushes to get more texture in your paintings and to make work simpler. Some people argue that it is cheating, but hey, everyone has their own way of working.
And, if you ever use someone's work, brushes, textures or whatever, make sure you credit them. It doesnt hurt to credit the rightful person. Since I only used default photoshop brushes, I do not have anyone to credit. But I will say that I googled a lot of Paint horses to study the different types of patterns and colors. The pose was not referenced.
I hope you like this walk-through and if you have any questions, just comment with it or mail me at rashichandra89@gmail.com.

Ooh, nice tricks. :D I always forget to do the horizontal flip. x_x Thank you! I've linked to your tutorial here:
ReplyDeletehttp://linedpaperandme.blogspot.in/2012/03/break.html
^_^
Thanks Ba!!
DeleteI am glad people are finding it helpful :D