About Me

My photo
My name is Rashi. I have been sketching ever since i learnt that a pencil leaves a mark on the paper. Sketching animals is what i love doing the most. Dogs, horses, dragons and other mythical beasts are my favourites. I am available for hire for freelance work of illustrations,graphic designing, character designing, storyboarding, etc.

Monday, March 26, 2012

Scared


Doggy is very scared of something. What is it?
--
Quick sketch of a random dog. Trying to work on perspective and poses now.

Tuesday, March 20, 2012

The Black Cat


I've been wanting to draw some sexy women, so here's Black Cat from Marvel Comics. Her costume is so simple yet so sexy.

Friday, March 16, 2012

Red Dog


I stumbled across these brushes on Deviantart and decided to give them a go. I liked a few of these brushes so I might use them in my artwork in the future. Although I feel these will be better if one uses them in simple illustrations or speedpaints or something.

Monday, March 12, 2012

BG-Thumbs


Trying to sketch some thumbnails real quick. They look so crappy..

Thursday, March 8, 2012

A huge board


I occasionally design stuff for this 'gaming lounge' named F.o.G or The Federation of Gamers. I was asked to design that huge board for them and it was up on display at DLF Place, Saket. I am so proud of this work because it is HUGE and is one of my first works to be printed in such a huge dimension.
You might not know, but I am a gamer. I love playing games and am currently even working as a concept artist at MPowered which is a gaming studio at Nehru Place, Delhi.
Anyway, you guys should totally check out F.o.G and give them a visit in DLF Place, Saket. You can play games there and they have loads of games, figurines and gaming gear. If you are a gamer-freak and haven't gone there, you totally should!!

Happy Holi Bloggers


Hope you all resemble Mr. Holi Chameleon today. Have a very Happy and Colorful Holi..

For those who want to know more about the festival,
Holi (Hindi: होली), is a religious spring festival celebrated by Hindus. It was a festival that commemorated good harvests and the fertile land. In addition to celebrating the coming of spring, Holi has even greater purposes. Hindus believe it is a time of enjoying spring's abundant colors and saying farewell to winter. Furthermore, Holi celebrates many religious myths and legends.

Saturday, March 3, 2012

Digital Paint:How I do it- Part 2

This is a continuation of PART 1 of my walkthrough.

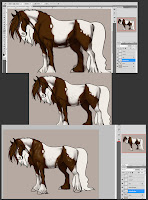
Now comes the shading part. I add another layer for shading. Please note that 2 separate layers were created. One for shading on the body. And one for shading the hair. Using the 2nd Brush, I lower the opacity to around 40-50% and the flow to around 20%. I pick a darker color and start blocking in the places where there will be shadows. I also change the eraser brush to Airbrush Hard Round and play around with the Opacity. If I don't like the shading at a particular place and feel it is too dark, I use the eraser to make it light. Since I am using the Airbrush Hard Round, pressure applied to the tablet plays a BIG role in how much color and with what intensity it is applied. Once I am satisfied with painting the shadows, I make another layer and start painting the highlights. The darker the color, the more shiny and reflective it will be. I use a light creamish color for the highlight part. Also, here, I use the smudge tool a little to blend the highlight. Once I am satisfied with the body, I move on to the hair. I use the same principle except I click on the shape dynamics this time. What that does is, taper the paint according to the pressure I apply on the tablet. It is handy when painting hair because hair become thinner at the end.


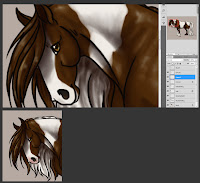
I add color to the other areas like the nose, eyes and the hooves of the horse. I also change the brush to Airbrush Soft Round 50% Flow pick a pinkish color, lower the opacity and paint the region around the muzzle. Horses usually have either pinkish or blackish area around the muzzle. Google horses for more information.


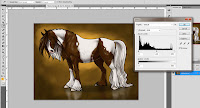
Once I am satisfied with the horse, I move onto the background. For this image, I have used a very simple background. I add a layer, move to second last in the Layer list and fill in a golden color. I change my brush back to the 2nd brush, pick a darker color and start painting the background. Keep in mind that darker colors are usually added to places that are further away from the area of interest. I pick a lighter color and add it around the horse like a rim. Like I said, darker color away from the area of interest and lighter color to highlight the area of interest. I play around with the brush settings, click on scatter, and paint some more. This gives interesting textures. I would advise you to check out the brush settings. Try painting on an empty canvas to get an idea of what tool does what.
I add another layer over the background layer and with the eye-dropper tool, I pick colors from the horse and paint its reflection. Once done, I go to Filter>Blur>Gaussian Blur to soften the brush strokes. I reduce the layer's opacity. I also add a shadow of the horse on a separate layer. I change the layer setting from Normal to Multiply and lower it's opacity too. Multiply layer setting is good when u are wanting to add more depth to the shadow. once all this is done I save the file into a .jpg and open that file. I hit Ctrl+L to open the Levels menu and play around with the settings of the brightness and contrast of the image. Once satisfied, I click on OK and hit save.


This is how the final image looks like.

Before ending, I would like to add that whenever you start painting something, please do a thorough research for lighting, perspective, anatomy, types of skins, etc. Practice as much as you can and EXPERIMENT. Photoshop is a vast ocean and you will discover a lot of new things everyday. Try making custom brushes to get more texture in your paintings and to make work simpler. Some people argue that it is cheating, but hey, everyone has their own way of working.
And, if you ever use someone's work, brushes, textures or whatever, make sure you credit them. It doesnt hurt to credit the rightful person. Since I only used default photoshop brushes, I do not have anyone to credit. But I will say that I googled a lot of Paint horses to study the different types of patterns and colors. The pose was not referenced.

I hope you like this walk-through and if you have any questions, just comment with it or mail me at rashichandra89@gmail.com.

Digital Paint: How I do it- Part 1

Hello everyone! I recently got a lot of requests from some people to make a tutorial of how I paint digitally. Now, I am not an expert at digital painting and am still learning it. Please keep in mind, the image was created for the sole purpose of helping out with this walkthrough. It is rushed because I wanted to finish it ASAP. But this is how I usually work.

Here are the tools I work with:
1. The Hard Brush (Spacing set to 1%). To add color and details.
2. The Airbrush Round Hard (Spacing set to around 5-7%). To add shading.
3. Smudge Tool (With scatter on and set to around 60-70%). To Smooth out shading.
4. Adobe Photoshop CS5.
5. Wacom Intuos 3 A4 (Large). Pen tablets are extremely handy tools. They give a LOT more control over the digital brushes.


I open a new Photoshop Document. I usually work on large canvas with dimensions around 1500 px to 2000 px. Sometimes even more. And the resolution is set to around 300 dpi. Use higher DPI if u want to get ur drawing printed. More the pixels, more the quality of the image. So, I add a new layer (Sketch) and I use the 1st brush (Hard Round) and decrease the flow to around 20% This makes the stroke come a little light depending on how much pressure I apply to the pen. A very handy tool in PS CS 5 is the Hand Rotate Tool. You can rotate your canvas with it. It is very useful to rotate the canvas at times so you get the lines right. It is also a good practice to flip your canvas horizontally to make sure your painting looks good as if gives you a fresh look. You see, staring at the same image all the time makes you feel it is looking very nice and this can cause your drawing look weird to the other person or if you look at it after sometime.


Next I change some settings of the hard round brush. I make sure the spacing is set to 1% and that the flow and opacity is 100%. I change the color to black. Add a new layer (Lineart) and start drawing the outline. MAKE SURE YOU ARE ON A DIFFERENT LAYER THAN THE SKETCH. Also, it helps to lower the opacity of the Sketch layer. Once done, I check to make sure the lines are smooth and erase out any problem areas.


Once I am satisfied with the lineart, I add two more layers for flat coloring. One for the body and one for the hair. Flat coloring is basically adding simple color to your character. In order to speed up your coloring, you can use the Magic Wand Tool and select whatever area you want to color. After I select the area, I go to Select>Modify>Expand. Then I enter 1 in the dialog box and hit enter. What this does is, it expands your selection evenly. I was not satisfied with the brown color, so I pressed Ctrl+U, which opened up the Hue-Saturation dialog box and fiddled with it till I was happy with the color. Then I selected the hair and colored them too. Also, if u want to de-select your selection, just press Ctrl+D.


Now, I love paint horses and decided to make this one a paint horse. Paint horses have 2 colors on their bodies and white plays a major role. I selected my 2nd brush (The Airbrush Round Hard), lowered down the Flow a bit and added the white bits. But before doing that, I switched on a very important tool; the "Lock Transparent Pixels". This is another VERY handy option. Using that, I can paint different colors on the Layer that has been locked. As you can see, the white paint is only on the body and nowhere else. Very handy.

Please go to PART 2 to see what I do next.

Thursday, March 1, 2012

Mister Lion


Portrait of a anthro lion. Trying to work on greyscale as well as lighting. I also wanted to make him look very gentleman-ly. These are fun exercises to do!